Tuesday, November 22, 2011

Journey of a Model Water Tower

Every model has its story. Some naturally make it to the top, others struggle through onerous obstacles to reach the summit. My three water towers have an entirely different story.
No, they look nothing like this.
The motive behind the model water towers is the annual AWWA Model Water Tower Competition. The idea is to build a creative model water tower, one that obviates the original intention of the tower and instead is judged and scored by means of four categories.
  • Design Ingenuity - The water tower must have a creative, original and well thought-out design.
  • Cost Efficiency - The water tower must use recycled materials.
  • Structural Efficiency - The water tower must be lightweight, sturdy, and have a high capacity.
  • Fill/Drain Rate - The water tower must be able to fill and drain quickly.
At the competition, there is a station where water is pumped into the tower and then drained, while being timed. Being engineers, me and the rest of the science club decided to focus on this aspect of the competition. Although this made the resulting water tower interesting, it proved to be a stymie since we overlooked the rest of the categories. Hindsight is always 20/20.

When the club finished last year's tower, we didn't think anything could go wrong on the day of the competition. In fact, we hemmed and hawed at the possibility that anything wrong was going to happen, since our drain rate was to be so stellar. Regardless, take a look at last years entry.
It's.. Beautiful?
Here's how it's supposed to work: The bag in the top compartment fills up with water. The tower then flips upside down from being lop-sided. The weights fall down, forcing the water out of the bag. Simple? Yes. Practical? No. The tower flipped too early on D-day, causing leaks from the added pressure of the pump and thwarting the drain rate. Despite the debacle, we still managed to win honorary mention and received $50 for our efforts. Gotta love pity points.

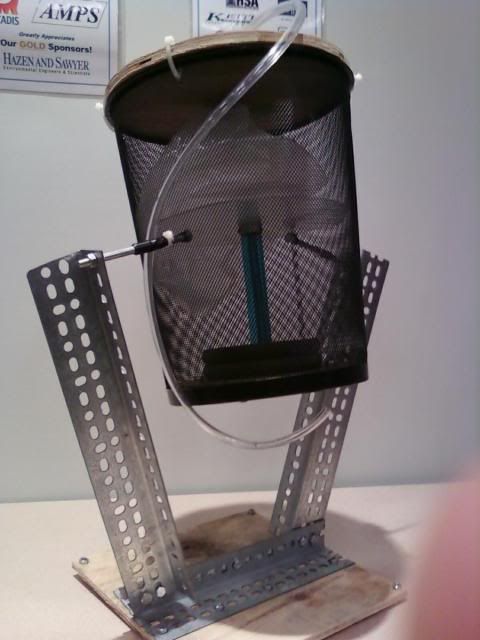
This year took on a whole new perspective. With General Grant in plenipotentiary power, our opponents were to cry in mercy. After weeks of discussion and planning, two creations emerged. Those would be the skyscraper and Slappy.
The skyscraper.
The skyscraper features a ramp at the bottom to funnel the water to the tube. It is made out of clear plastic, presumably lexan, which was salvaged from the front of a rear-projection TV. It is held together with plastic epoxy and waterproofed with silicone sealant. Overall, the engineering crew and the design crew did a fantastic job.
Slappy Slapple "Le Gator" Reptar.
Constructed of scrap plywood, Slappy is unflappable, standing strong in the face of danger. His jaw is held by two hard drive magnets, which are precisely adjusted to let go when the bag fills up with the right amount of water. When the jaw swings down, it clamps the bag using more magnets, one of which can be seen in the picture. The result leaves Slappy with a rather surprised look as his jaw hangs slack.

Now, I worry about Slappy. The bag is actually a nylon bucket with a plastic sheet attached to one end. The bag's umbilical cord sways loose, being affixed only by silicone sealant. Airtight it is, but on the day of the competition the bag turned out to be a sheer farce. Due to the bag's rigidity, Slappy was reluctant to fill up with water, and instead leaked like a fire hose. All hope was lost.

Unfortunately, the day ended with neither Slappy nor the skyscraper taking a spot on the winner's podium. The judges, being the benevolent people they are, decided to recompense the science club for all of the effort we gave. Slappy ended up winning best design ingenuity, and the skyscraper won judges top pick for a total of $100. After hearing this, my grin could be seen from a bird's-eye view. Satisfaction at last!

Grant

Wednesday, November 16, 2011

Twin HeNe's

On my everlasting quest to have the consummate laser collection, I have dwelled upon the darkest spelunks of the internet to find true treasure. When an excellent deal came up for an 18 inch 2mW green helium neon laser tube, I knew that this would definitely be a worthy investment to the collection. Coincidentally, at this time I spotted a neglected and diminutive .08mW tube of the same type, waiting to be adopted. This poor fellow was a third of the size, and the beam was multi-mode. After weighing my options and consulting my wallet, I decided to adopt both the little HeNe tube and his big brother.
Twin Yellow and Green HeNe lasers!
However, the little 6-inch tube still didn't have a home. I had a portable 6-inch red HeNe built into a transparent plastic enclosure, so I swapped the green into there for some time.
Red HeNe in plastic enclosure.
After some careful thought and planning, I realized that the enclosure was actually large enough for both of the 6" red and green HeNe tubes. I bought another power supply brick, and installed it in the enclosure.
Two HeNe's installed!
Both tubes run off of 880V, which is provided by the copper blocks. The two white 3V lithium "D" batteries provide power to the copper blocks. The red switch activates the red HeNe, and the green switch activates the green HeNe. In order to add to the color fusion combination, I aligned the beams to combine using a dichroic mirror, one which passes green light but reflects red.
View of the green laser passing through the dichroic mirror.
View of the red laser reflecting off of the beam-positioning mirror.


Combined dot from the red and green lasers.
I love the plasma exposure!

Ahh, the nice warmth of the helium neon laser. Even though 543nm green is about four times more visible to the eye than 632nm red, the red HeNe still overpowers the green HeNe in brightness. The one thing interesting about the green HeNe though is that not only is it multi-mode, but it also mode hops! Since movement is not characterized well in pictures, I whipped out the GIF-ation machine and created an animation to convey the effect.
Fantastic!
Grant

Friday, November 11, 2011

The magic box

A few years back I saw a video of one of the coolest things ever: a laser Spirograph. This is a little device that sucks in a laser and spits out a light show. I was so compelled by the mesmerizing shapes it formed that I had to make my own. And so I did.
Again, not my greatest creation.
The idea is that the laser passes through the hole on the bottom left, bounces off the four mirrors, and exits through the hole in the top. But how does this device make such pretty patterns? Well, that's where the magic comes in.
The green laser bounces off of the four mirrors and makes its way out.
The magic is with the motors. The mirrors are glued on so they're at a slight angle. Thus, any rotation will cause the laser to slightly shift in a circular motion. Turn one motor on and the box will project a circle. Turn two motors on and strange things start to happen. The movement of one mirror on the laser combines with the  movement of another, causing polar-like patterns to emerge, such as deltoids and limaçons. Turn a third motor on, and three-dimensional images begin to appear. Delightful!
Potentiometers and DPDT (three position) switches.
In order to get maximum control over the motors, I installed three 1K potentiometers and three DPDT (on-off-on) switches, one for each motor. The potentiometers control the speed, and the switches control the direction of the motor. Since the motion of the three mirrors is relative to the other three mirrors controlling the laser, only two switches and potentiometers are needed. However, for versatility and consistency, I installed all three. In order to power the device, I use a 6V wall-wart with an audio plug soldered on for easy connection. Hey, it's what I had on hand.
Spiral!
Since none of the pictures I took captured the full justice of the projected images, particularly due to the slow speeds of the motor and the fast speed of my camera's shutter, there had to be an alternative. I'd like to introduce... Spiromations!


I can watch these for years! Each of these was made using a 405nm 20mW laser on white construction paper. As an added bonus, if I project the image on glow in the dark paper, I can cause it to glow!
5-pointed star!
Amazing! There's no need to explain why the laser spirograph is one of my favorite projects. It is simply too cool.

Grant

Tuesday, November 8, 2011

The smallest TV ever?

A while back a good friend of mine gave me a whole mess of old cassette camcorders. After testing them out and finding out that most of them didn't work, I began taking them apart. Aside from the numerous lenses I found, I also discovered an invaluable jewel inside the viewfinder of one. That jewel would happen to be the viewfinder itself, which was actually a CRT television! I was ecstatic.
Adorable!
Before I could put the TV to use, I had to figure out the pinout. I turned the camcorder on and used my multimeter to probe for the power input. 5 volts, no problem! I used a composite signal to figure out the input, which would be apparent when the image is displayed. I soldered on a RCA connector for convenience, so any video signal can easily be plugged in.
You can see the RCA plug and 5V wires soldered on.
Using the TV is a breeze. Simply plug the 5V wall wart into any outlet, and the TV powers on. Plug in a composite video signal and the TV instantly displays it. It's really that easy!
5.1V is close enough.
The TV is much smaller than it looks. Here's a picture showing how small the actual screen is:
About 1.5cm in diameter!
The screen has a 4:3 aspect ratio and boasts a 480 by 360 resolution in 1.2 by 0.9 cm. To add to the archaism, it's in black and white! Astonishing!
All right!
So what am I going to do with this TV? I have plans to build a wooden cabinet for it and model it after those really bulky televisions. Ideally it would be portable and have a small audio amplifier for watching TV on the go. That probably won't happen for a while though, since I've been incredibly busy lately. It definitely will be a fun project though!

Until next time,
Grant

Sunday, November 6, 2011

A demonstration and a medley

Hello everyone! What I have for you today is a demonstration of my synthesizer, the Roland JP-8000. I could talk about it all day long, but what good is talking when I have a video to demonstrate it's capabilities? In the video I show how to create a patch and then I play ten melodies using one of my preset patches.
Grant

Saturday, November 5, 2011

Lasers? In my Altoids?

Hey guys! I know I promised all of you that I would post some of my engineering projects. Well, this is one of my favorite ones, primarily due to its simplicity. This is also one of my first laser projects, so it isn't remarkably unique. However, I did manage to slip in a few extra features in it, notably the safety switch on the inside.
It has seen better days.
Operation is simple: Just flip the switch so it is pointing at the aperture of the laser, which is covered by the orange dust cap. For now, lets take a look inside.
Where are the Altoids?
As you can see, the bulk of the inside holds the batteries. You can also see the driver, the safety switch, the actuator, and the diode, which is fed by the red and black wires going into the aluminum heat sink.
Gruesome!
The driver is the fabled Groove 2 driver, which is based on a TLV1117 voltage regulator with a LM385 as a voltage reference. I reverse engineered it so that the safety switch selects a different resistor upon a different setting of the switch. Since it is a 3-throw switch, the center position is a secondary off position. Hence the purpose of the safety switch. The upper position corresponds to a low power setting, adjustable from 40mA to 100mA. The lower position corresponds to a high power setting, adjustable from about 150mA to 300mA. Unfortunately, I do not have a laser power meter, so I cannot test the output power. I can test the input current by putting a 1-ohm resistor in series with the laser, so each mV read by my multimeter translates to one mA. For the test, I put the resistor across the turned off switch.
The low power setting.
The high power setting.
Here is a look at the laser diode, a 16X LCC, meaning long closed can, originally extracted from the DVD module of a Blu-Ray disc burner.
You can see the blue AR (anti reflective) coated window of the diode.
In the following picture I turned the laser on low power to see the die of the laser in operation, and added a lens and a blue filter to the camera to help it focus and to reduce the saturation.

Notice how the light comes out at a pinpoint.
Amazing! There's one more thing I must add to this post. On the topic of laser safety, I did not turn on the laser on high power without wearing my laser safety glasses. Sure, they may be cumbersome, but the eyes are objects that can never be replaced. One risky move can damage them forever.
Certified to filter out red wavelengths by a factor of 10,000. 
That's all for now!
Grant

Thursday, August 25, 2011

The Noots

Congratulations! If you're one of the lucky few reading this message, then you deserve a pat on the back. Alas, you made it this far, but tis a hapless circumstance that back pattings do not transfer very well over the internet. Thus, I will have to give you The Noots.
Download: The Noots
Made entirely in FL Studio 10, using programmed sounds from my Roland JP 8000. Enjoy!
Grant

Wednesday, August 24, 2011

Ferrofluid for the neophytes.

If there's one thing that gets on my pet peeves, it's the one curious friend who touches your stuff and doesn't put it back where it belongs. Farewell $13.99 flashlight; wherever you may be.
He'll have to do the job for the time being.
Fortunately, I had a Shamwow to clean up the tears. (I'm still an advocate for Zorbeez, but who sells that anymore?) Unfortunately, there's one thing that the Shamwow doesn't clean up.
In fact, nothing can clean this up.
That's the magnetic liquid we all know and love. Especially my physics professor, who didn't realize how ferromagnetic the fluid actually is until he held a magnet next to the open bottle. I'll let you imagine the rest.

Time to answer the million dollar question: Where do you buy ferrofluid from? I purchased mine from United Nuclear, but I personally believe that all ferrofluid is the same. So go ahead and buy it on Ebay, and who knows, it might have bits of love in the packaging.

Now you're getting anxious. What is there to do with this stuff? Did I really just waste my money on it? Sadly, there's no turning back now. It usually goes something like this:

  1. Put a magnet next to the bottle. 
  2. Make a prodigious mess. 
  3. Attempt to launder it with more magnets. 
  4. Spend hours fruitlessly trying everything to clean it up. 
  5. ??? 
  6. No, no profit this time.
Thankfully, we have jars.
Oh Dickinson's preserves, how you make life so easy.
A nice jar o' jelly does the trick, but it doesn't capture the full fluidic essence of ferrofluid. Thus the testing began. I tried putting the ferrofluid in several disparate liquids in order to achieve a floating effect. The only liquid that worked was fog juice.
I'm convinced.
Fog juice is typically a combination of glycerin and water, so perhaps if someone wants to test out combinations of such fluids then you are free to report your findings. However, since there is water in the fog fluid, the ferrofluid will rust over time. This doesn't affect the consistency of the fluid, but the rust makes it a nice bronze color.
Magnets; How do they work?
Electrons.
Grant

Monday, August 22, 2011

3D Shades: A fun and easy project!

Gentlemen! I've come to the realization that this blog needs some more pizzazz. This first project is perhaps one of the most simple and elegant for the sapient physicist, partly because of the fact that even I can hardly explain what is going on. If you're like me and you have a spare collection of 3D glasses from all the times you went to see Avatar, then this project will be jolly simple.
I love the guy with the pizza.
That's because all you need for this project is:
  • Two pairs of 3D glasses
  • Glue
As Porky Pig was once known for saying, "That's all folks!" Unfortunately though, there's never a happy ending. If you've never glued something together, then this project could easily turn into a mess. Or, if you cherish your collection of esoteric spectacles and need to keep your only two pairs of 3D glasses, then that's completely understandable. Or, perchance, the only glue in your household is the small jar of Elmer's that you enjoyed dipping your carrots into as a child. If one or more of these applies to you, then you have my permission to temporize doing this project until you have the necessary supplies. If none of these apply, then let's get on to the nitty-gritty, shall we?

The first step is to conglomerate your 3D glasses. Mine are of the "Real D 3D" variety, thus I cannot guarantee that this set of instructions will work with any other kind. In order to check, put the glasses together lens-to-lens and keep an eye out for any opalescence. They should look like this:
Or they may look like this:
Once you have your two 3D glasses, you must break one of them, preferably the sweaty pair your friend used while watching the diaphoretic movie. The best way to do this is to bend the arms of the glasses back until they pop off. Once one arm comes off, do the same to the other arm. Your glasses will then look like this:
At this point, your polarizing filters are easily retrievable and ready to go. This is a good time to clean them off. Personally, I recommend a quick wipe with 91% isopropyl alcohol. You can also curtail the little notches on the filters, I find that nosehair trimmers work exceptionally well at doing this.
Put the filters over their respective spot on the pristine pair of 3D glasses. This may require a fair amount of fidgeting to get right.
I have no clue why the next photo is sideways.
Now get out your adhesives and glue those suckers on! Elmer's actually works, but it tends to peel off over time. For the pair in this post I used Locktite Plastic Epoxy, but that's only because I had it on hand.
I have no clue why the previous photo is sideways.
In order to keep the frames flat I used helping hands, but holding a pair of glasses for five minutes while waiting for glue to dry isn't exactly onerous. Since you're now done, put your shades on and make faces at yourself in the mirror!
Problem?
The most interesting thing about these glasses is the fact that they change colors depending on the angle you look at them. This photo, taken with a sheet of glass under the glasses, clearly demonstrates that effect.
It's science.
Why does it do this? I'm not exactly sure, but I believe it has to do with the different colors being polarized at different angles. Both lenses are a dark purple from the front, which verifies that the lenses would be the same color at the same angle. However, if someone has a more logical explanation, or if I'm missing something obvious here, then feel free to edify me.

Until next time,
Grant